Introduction
The blanket stitch is a fundamental hand-sewing technique that adds a decorative and functional edge to fabrics. Often used in quilting, appliqué, and crafting, this stitch is ideal for finishing raw edges and preventing fraying. With its simple yet elegant appearance, the blanket stitch is perfect for beginners eager to enhance their sewing skills. This guide will walk you through the process of mastering the blanket stitch, providing you with all the tips and techniques you need for success.
Materials Needed
- Fabric: Choose a fabric that you wish to edge or applique.
- Thread: Use a contrasting or matching thread, preferably embroidery floss or heavy-duty sewing thread.
- Needle: A hand-sewing needle that is suitable for your thread.
- Scissors: For cutting the thread.
- Marker or Chalk: To mark the stitching line (optional).
- Ruler or Measuring Tape: To ensure even spacing (optional).
Step-by-Step Instructions
Prepare Your Fabric
Start by preparing the edge of your fabric. If you’re working with a piece that has raw edges, consider using fabric glue or interfacing to stabilize the edge before stitching. For a clean finish, mark the line where you want the stitches to go. This step is optional but can help maintain uniformity.
Thread the Needle
Cut a length of thread, approximately 18 to 24 inches long. Thread the needle and tie a knot at the end of the thread. If you’re using embroidery floss, you may want to separate the strands to achieve the desired thickness.
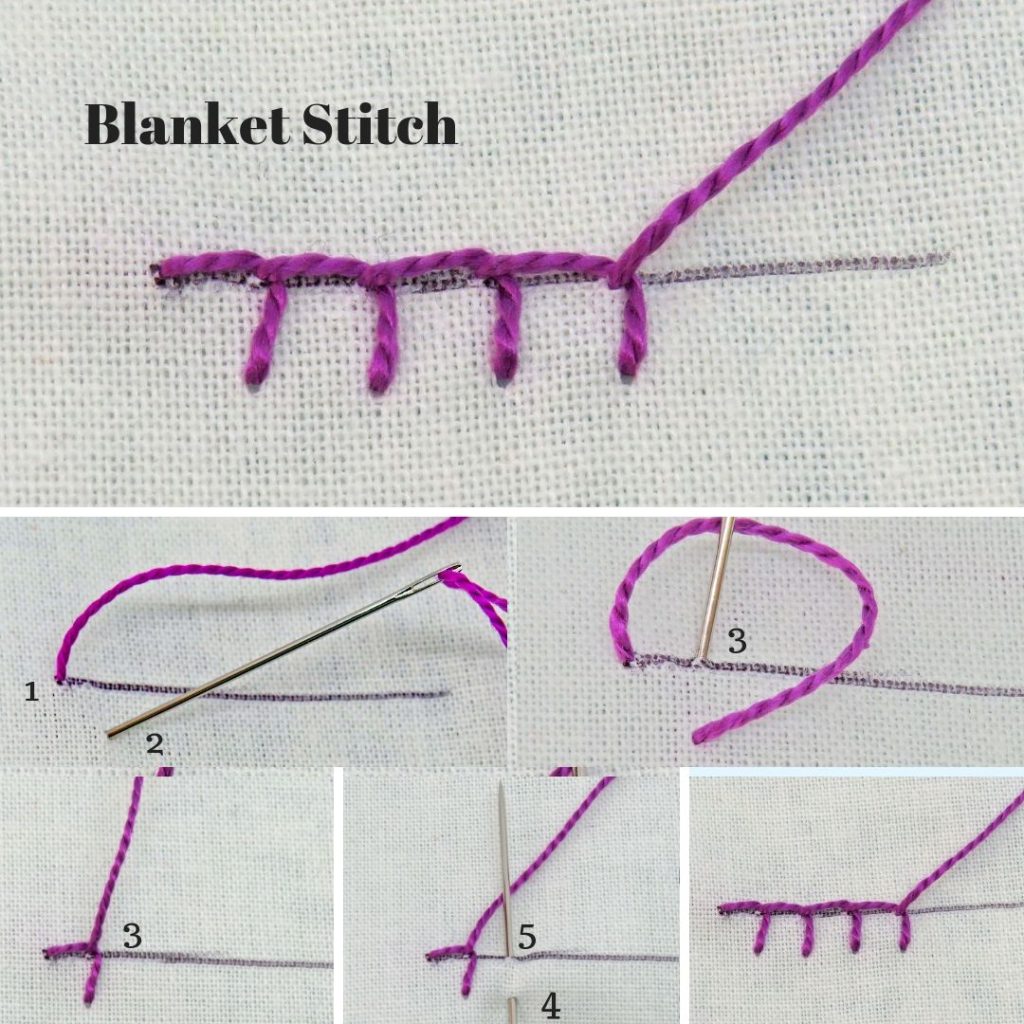
Start the Stitch
Begin by inserting the needle from the back of the fabric to the front, making sure the knot is hidden behind the fabric. Pull the thread through until the knot catches on the fabric. Position the needle where you want your first stitch to be.
Create the First Stitch
Insert the needle back into the fabric from the front to the back, just a short distance away from the first point. This should create a small loop on the front side of the fabric. Make sure the loop is the size you want for the blanket stitch.
Form the Loop
Bring the needle back to the front of the fabric, threading it through the loop you created in the previous step. Pull the thread tight to secure the stitch. Repeat this process, maintaining even spacing between stitches.
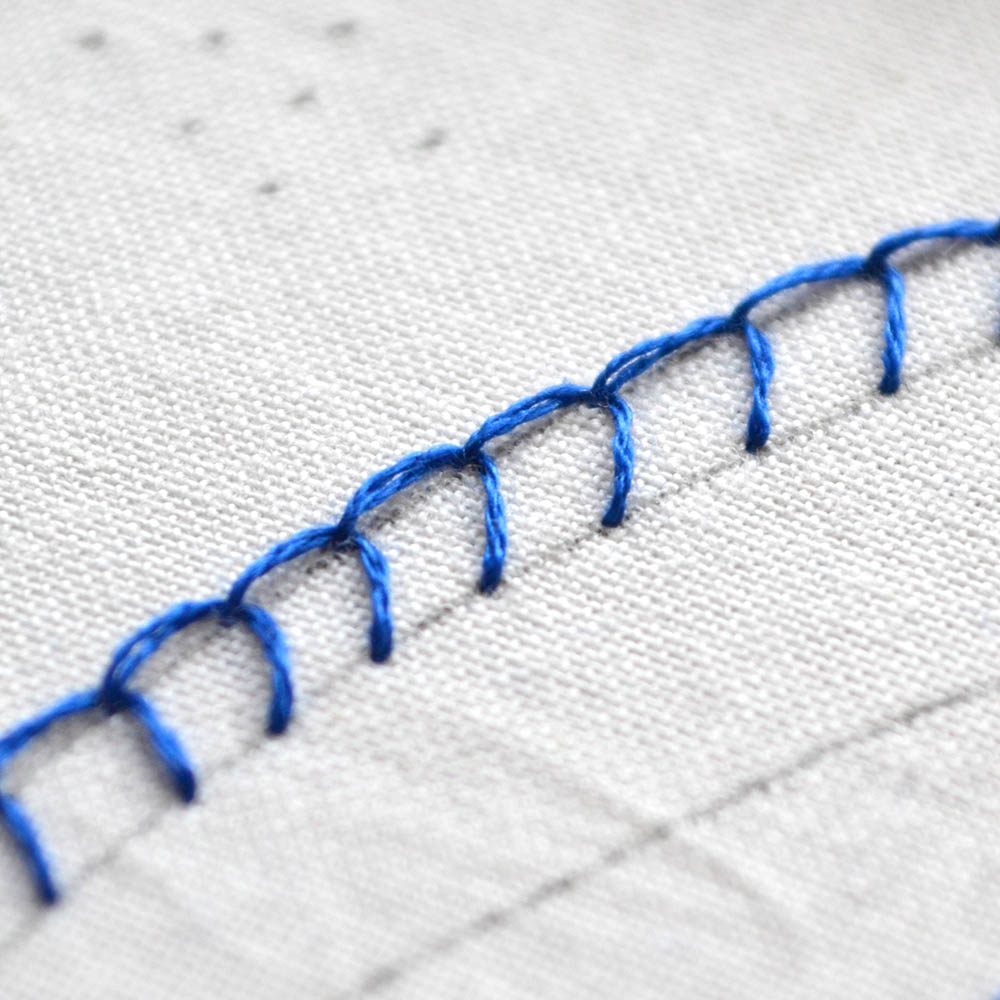
Maintain Consistent Tension
As you work your way around the edge, keep the thread tension consistent. Too tight or too loose stitches can result in an uneven edge. Regularly check the spacing and alignment of your stitches to ensure a uniform appearance.
Finish the Stitch
When you reach the end of your stitching line, finish by tying a small knot on the backside of the fabric. Trim any excess thread with scissors. If you’re working on a project with multiple layers or edges, make sure to secure all ends properly.
Press and Inspect
For a polished finish, press the fabric gently with an iron, being careful not to distort the stitches. Inspect your work to ensure that all stitches are even and securely fastened.
Tips for Success
- Practice on Scrap Fabric: Before working on your main project, practice the blanket stitch on a scrap piece of fabric to get comfortable with the technique.
- Use a Ruler: If you want to achieve precise spacing, use a ruler to mark evenly spaced dots along the edge.
- Experiment with Thread: Different types of thread can create varying effects. Experiment with different colors and thicknesses to see what works best for your project.
- Keep Stitches Even: Consistency is key. Pay attention to the size and spacing of your stitches to achieve a professional look.
Applications
The blanket stitch is versatile and can be used for a variety of projects. Some common applications include:
- Quilting: Finish the edges of quilt squares or add decorative elements to quilt blocks.
- Appliqué: Secure appliqué pieces to your fabric with a decorative edge.
- Crafts: Use the blanket stitch to add a finishing touch to handmade items like coasters, bags, and ornaments.
Materials You Will Need:
- Fabric or item you wish to stitch (e.g., a blanket edge, a piece of cloth)
- Embroidery floss or heavy thread
- An embroidery needle with a large eye (to accommodate the thread)
- Scissors
- Optional: hoop (to keep the fabric taut while stitching)
Thread Your Needle
Start by cutting a length of embroidery floss to about 18-24 inches. Longer threads can become tangled easily, so it’s best to work with manageable lengths. Thread your needle and tie a knot at the end.
Prepare Your Fabric
If using an embroidery hoop, place your fabric in the hoop and tighten it to ensure the area you’re working on is taut. This helps keep your stitches even and neat.
Begin the Stitch
Find the starting point on your fabric’s edge where you want the blanket stitch to begin. Bring your needle up from the back of the fabric, leaving a 1/4 inch tail.
To start the first stitch:
- Insert the needle back into the fabric close to where it emerged, but do not pull it all the way through.
- Loop the thread under the needle from bottom to top, creating a small loop on the front of the fabric.
- Hold this loop with your thumb or a laying tool as you gently pull the needle through to form a secure stitch.
Continue the Stitch Pattern
For subsequent stitches:
- Insert the needle into the fabric about 1/4 inch away from the previous stitch, going down through the fabric edge and coming up again a little further along.
- Repeat the looping process under the needle before pulling tight. Ensure each loop is snug against the previous one, creating a neat, even line.
Tip: Maintain consistent spacing between stitches for a professional look. The size of the loops can be adjusted based on personal preference or the project’s needs.
Finishing Off
When you reach the end of your stitching line:
- Make the final stitch as usual but before pulling it tight, thread the tail of your starting knot through the last loop.
- Gently pull to close the loop and secure the end.
- Run the needle under a few stitches on the backside of your work and weave in the remaining thread to hide it.
Variations and Tips
- Whipped Blanket Stitch: After completing the basic blanket stitch, use a separate thread to “whip” over the top of the stitches, adding texture and color.
- Reversed Blanket Stitch: Work the stitch from left to right instead of the traditional right to left, creating a mirror image effect.
- Spacing: Experiment with different spacing between stitches to achieve various looks. Closer stitches create a dense, almost woven effect, while wider spacing allows the fabric beneath to show more.
- Practice: As with any new skill, practice makes perfect. Start with scrap fabric to get comfortable with the motions before moving onto your main project.
- Stitch Direction: For corners or curves, adjust the angle at which you insert the needle to smoothly navigate the turn.
By following these steps and tips, you’ll soon master the blanket stitch, unlocking a world of creative possibilities for your embroidery and sewing projects. Whether you’re a beginner or looking to refine your skills, the blanket stitch is a timeless and valuable addition to your crafting repertoire. Happy stitching!
Conclusion
Mastering the blanket stitch opens up a world of possibilities for enhancing your sewing projects. By following this step-by-step guide and practicing regularly, you’ll be able to add both functionality and beauty to your fabric creations. Whether you’re a beginner or looking to refine your skills, the blanket stitch is a valuable technique that will serve you well in many sewing endeavors.